Last Updated on
If you recently purchased ST-15D Class 1 Sound Level Meter from Scarlet. Here is a quick guide article to get you started with your sound level meter. For detailed instructions, please read the manual.
Before Using
- Check if microphone has been installed properly.
- Check if battery has been put in. If battery is low while device is in-use, the battery indicator will blink as a reminder to change battery.
- Calibration: if you just recently purchased it, you don’t need to perform any calibration before using since it has been calibrated. However, if you’ve been using it for a while, it is recommended to perform calibration every year to ensure accuracy.
- Use windscreen to reduce the influence of wind noise in windy situation. The use of windscreen can reduce noise about 10-15dB.
- If the sound level meter is used for long time continuously, it is recommended to use external power supply through USB socket at the lower right part of the device. When external power is used, the power from battery will be cut off automatically.
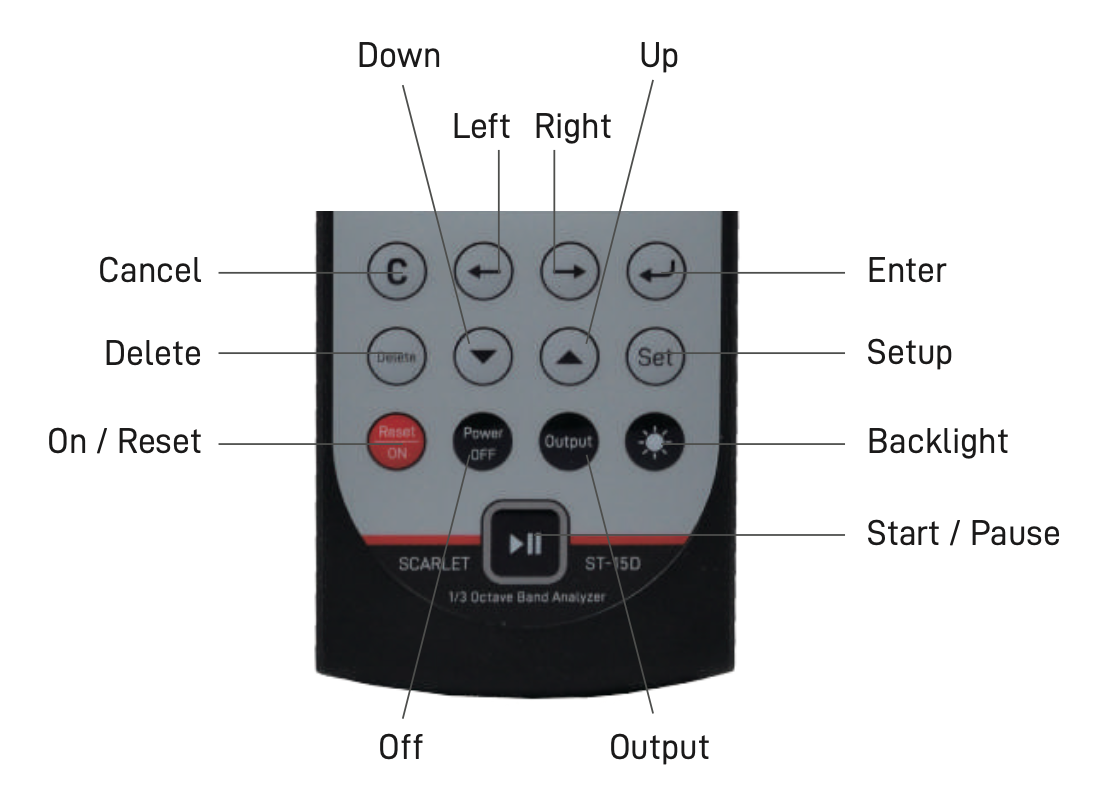
Before you continue reading, to give you a better idea, here is a quick overview of the buttons that will be mentioned in the following instructions.
Choosing a Measurement Interfaces
The ST-15D Class 1 Sound Level Meter have three different measurement interfaces designed to do different kinds of measurements based on your needs. These measurement interfaces can be accessed from the “Main Menu” > “Measure” ( long press “reset/on” button for more than 2s then releases it and press the “enter” button):
- Statistic Analysis Interface: there are two modes available “Once” and “24H”. The “once” interface means it will do analysis for one time, while the “24H” means that the measurement starts automatically every one hour at integral o’clock (total 24 times). The measurement duration can be set by user, it must be bigger than 1 min and less than 59min. If it is not within this range, the default setting will be 1min-1h.
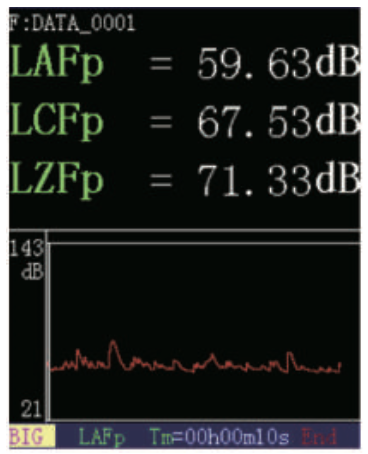
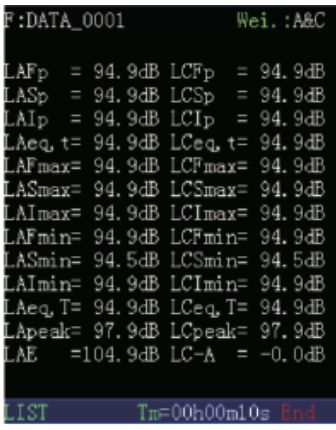
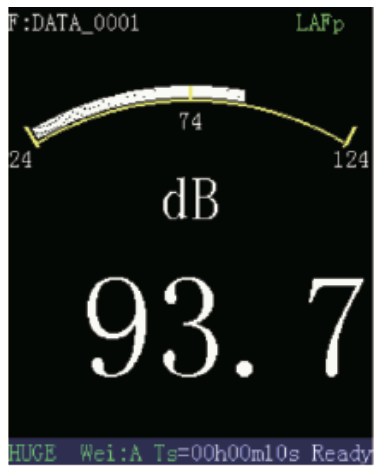
- Integral Measurement Interface: in the integral measurement, there are four modes that you can choose: Sim, Big, List, and Huge.
Sim Display Big Display List Display Huge Display 


- GPS Positioning Interface: this function can be used for distance, positioning measurement and calibrating the RTC (higher precision). We will cover the distance and positioning measurement in this section, while for the calibration part, please further read it in the manual (page 47).

- To start with, please connect to external antenna and put it outside the room where the antenna can directly receive the satellite signal (it will take 1 minute).Turn on the ST-15D and enter the basic setup interface, either set the GPS option as “Save” or “Open” mode. If connected successfully, it will show the satellite number under “Star Num”.
- For distance measurement: Please go to the GPS interface. Press the “Set” key to calibrate the time of instrument by GPS time. Press the “enter” key to start measuring the distance between two points. Press “enter” key again when you finish.
- For positioning measurement: Go to the noise measuring interface, then go to “Statistics” and press “up” or “down” key to enter the GPS interface. Open the GPS module and startup it, the last four lines show the position and velocity measured. Kindly note during the noise measurement process, the measurement interface can switch to GPS interface but it will not affect statistics and integral measurement.
How to Set Time and Frequency Weighting
You may need to use different time and frequency weightings for different projects. Here’s how to choose time and frequency weightings.
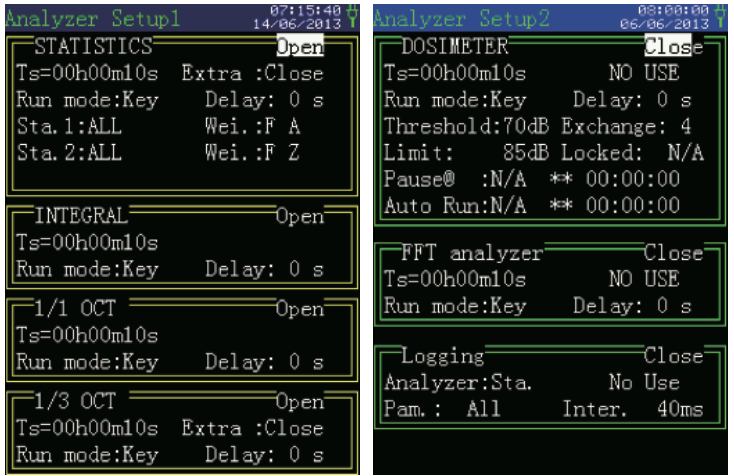
At the Main menu, tap the “Setup” button, then go to “Analyzer” (Analyzer Setup1)
- Click “Open” at the right upper side by pressing the “Up” or “Down” button. The frame will be in yellow color when it is on open mode.
- See the first menu “Statistics”.The time and frequency weightings can be chosen next to Wei. For example: Wei.: F A (first: time weighting, second: frequency weighting)
- Time weightings: F, S and I can be chosen
- Frequency weightings: A,C and Z can be chosen
- After finish choosing, go back to the upper side and choose “Close” by pressing the “Up” or “Down” button. The frame will turn into green color.
How to Apply 1/1- or 1/3 Octaves Band Filters
If you have the upgraded ST-15D Class 1 Sound Level Meter with 1/1 or 1/3 Octave Band filters. Here’s how to activate the octave band filters to your measurement.
At the Main menu, tap the “Setup” button, then go to “Analyzer” (Analyzer Setup1)
- Go to the “1/1 OCT” or “1/3 OCT” menu display.
- Click “Open” at the right upper side by pressing the “Up” or “Down” button. The frame will be in yellow color when it is on open mode.
- Here you can adjust the “Ts” (measurement time), “Run mode”(startup trigger), and “Delay”. The default setting for the startup trigger mode is Key with 0s Delay, which means measurement will start immediately after pressing “enter” button.
- After finish setting, go back to the upper side and choose “Close” by pressing the “Up” or “Down” button. The frame will turn into green color.
How to Export Data (Data Logging)
Users can easily manage and export noise data through ScarletSound – a Windows PC compatible software which is available for free for Scarlet ST-15D users.
Kindly note to avoid double saving the data and save memory space, please take out the SD card if you wish to do data logging using ScarletSound. Please only insert SD card for noise recording.
ScarletSound Software Download and Installation
- Download software directly from our website here or from the USB drive that is included in your package.
- Extract and run the program file “ScarletSound.exe.”If you use Windows Vista (or later), please right click on the file and choose “Run As Administrator”.
- Select destination folder to install ScarletSound application and install it.
- After installation is complete, double click to run the ScarletSound application.
- The data stored in the ST-15D Class 1 Sound Level Meter can be transferred to computer via RS232 cable or USB. Connect the SLM to computer with RS232 cable or USB cable, then run the ScarletSound.
- Click Setup to go to Setup menu. Choose “USB” if you use USB. Choose “COM” (the default baud rate is 115200) when using the RS232 cable. Click OK to save the settings.
Download and Save Data
- Click the option “Read” to download data from instrument, and the data will be shown in the interface of the software.
- Save data with the format of “.xls”, then click “Export”.
Clearing Displayed Data in the Software
When data in the SLM is deleted, the displayed data in the software will not be automatically deleted. Click “Clear” or restart software to clear the displayed data.
Summary
The ST15D Class 1 Sound Level Meter is a great choice for those looking for advanced noise monitoring system. The ST15D model allows user to add 1/1 or 1/3 octave band analysis features now or later.
If you’re still unsure of whether you need the octave band analysis or not, we normally recommend our clients to use the ST-15D standard model first. If later on they need the 1/1 or 1/3 octave band function, we can add this feature for them.
Get accurate noise measurement reports and assess noise exposure level with ease using ST-15D Class 1 Sound Level Meter. Learn more here.